HOW TO PURCHASE TRIPTIME INSURANCE
By Jason Jourdan
You and your friends have planned to explore the world since college. After your first night on the trip, you wake with severe stomach pains and a high fever. You cannot start your adventure. Instead, you need emergency medical care – and quick.
With Triptime Insurance, you won’t be paying a huge medical bill. You’ll also have assistance services – in your own language – to locate a suitable medical facility and arrange transportation.
Here’s a quick guide to purchasing Triptime Insurance for all of your epic journeys.
STEP 1 – GO TO THE TRIPTIME INSURANCE WEBSITE

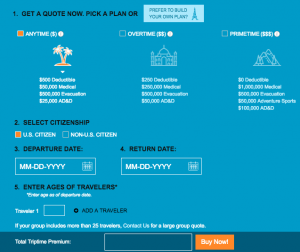
Quote page from Triptime Insurance site
STEP 2 – SELECT A PLAN
Anytime is a plan with the lowest cost coverage for trips to safer places and developed countries. Shorter duration travel without adventure sports coverage. Best value for simple business or leisure travel.
Overtime is a mid-priced plan for more strenuous travel to less developed locations. This coverage is perfect for the curious traveler who likes to explore new and old cultures in out of the way places. No adventure sports coverage.
Primetime is our answer to your wildest travel urges. This plan provides protection for adventure activities, team sports, and extreme pursuits while traveling. The coverage limits are increased to the maximum, just like your adrenaline.
Prefer to Build Your Own Plan is our a’la carte purchase option. By selecting this mode, you can choose the following:
- Medical Maximum (maximum amount of medical coverage)
- Deductible (dollar amount of medical expenses paid out of pocket before the plan pays any benefits)
- Transportation (emergency medical evacuation)
- Adventure (coverage for all named adventure and extreme sports)
- AD&D (accidental death and dismemberment)
STEP 3 – OBTAIN A QUOTE

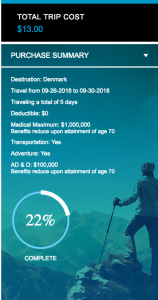
Quote for 30 year old, traveling 5 days to Denmark with the highest level of coverage.
Once you have selected the plan type, enter your departure and return dates and your age.
Your quote will display at the bottom of the main page (shown above) if you have selected one of the 3 pre-made plans.
If you opt to build your own plan, your quote will display on the right side of your screen after you have entered departure and return dates, as well as your age. Under this option, you may toggle through all drop-down menus to see difference in premium by including and excluding certain benefits.
STEP 4 – ENTER TRAVELER INFORMATION
Once you have obtained a quote for your selected coverage option(s), you will fill out your name, date of birth, gender and email address. Under “Traveler Information” you will have the option to add additional travelers, as well.
After entering traveler information, enter your primary address. Note: Triptime Insurance is currently not available to residents of New York, Arkansas, Maryland and South Dakota.

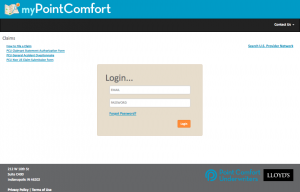
Login page for MyPointComfort (my.pointcomfort.com)
STEP 5 – REGISTER FOR MYPOINTCOMFORT
MyPointComfort is a one-stop portal for all of your policy needs. You can access your certificate, ID card, receipt and important claim-submission documents.
To register, you will enter your email address and create a password.
STEP 6 – CONFIRM AND PURCHASE
Before you enter billing information, you will need to confirm your agreement and understanding of the application by checking a box.
Enter billing information and hit submit – YOU’RE ALL SET!
You will receive an email with all of your policy documents. Accessing MyPointComfort is another quick and easy way to access your ID card, claims instructions and more!

Peace of mind…without taking up valuable luggage space!
